
Pieter Bruegel the Elder, The Peasant Dance, 1568
Table of Contents
Tutorial
In this section, we will learn how to code to acquire images by using Harvester.
Harvester works as a minimalistic front-end for image acquisition. Just importing it from your Python script, you will be able to prepare the required images for your application without any hustle at the speed which the GenTL Producer offers.
Workflow Overview
A typical workflow consists of the following steps in that order:
- Loading GenTL Producers
- Enumerating devices
- Getting ownership of a target device
- Acquiring images
- Closing application
Loading GenTL Producers
First, let’s import Harvester:
from harvesters.core import Harvester
Then instantiate a Harvester object; we’re going to use h that stands for
Harvester as its identifier.
h = Harvester()
And load a CTI file on the Harvester objecjt; loading a CTI file, you can communicate with the GenTL Producer:
# ATTENTION! Please use the CTI file in the original location!

# Why? Visit https://github.com/genicam/harvesters/wiki/FAQ and
# read "I pointed out a CTI file but Harvester says the image doesn't
# exist (Part 2)."

h.add_file('path/to/foo.cti')
Note that you can add one or more CTI files on a single Harvester object. To add another CTI file, just repeat calling add_file method passing another target CTI file:
h.add_file('path/to/bar.cti')
And the following code will let you know the CTI files that have been loaded on the Harvester object:
h.files
In a contrary sense, you can remove a specific CTI file that you have added with the following code:
h.remove_file('path/to/foo.cti')
Enumerating Devices
Now you need to update the list of devices; the operation will fill up your device information list and you’ll select a device which you wish to control:
h.update()
The following code will let you know the devices that you can control:
h.device_info_list
Our friendly GenTL Producer, so called TLSimu, gives you the following information; in this example, the list consists of four devices and each entry is represented as a dictionary. Each dictionary key can be used as a search key when you specify a target device which you wish to get the ownership:
[{'display_name': 'TLSimuMono (SN_InterfaceA_0)', 'id_': 'TLSimuMono',
'model': 'TLSimuMono', 'serial_number': 'SN_InterfaceA_0', 'tl_type':
'Custom', 'user_defined_name': 'Center', 'vendor': 'EMVA_D', 'version':
'1.2.3'}, {'display_name': 'TLSimuColor (SN_InterfaceA_1)', 'id_':
'TLSimuColor', 'model': 'TLSimuColor', 'serial_number': 'SN_InterfaceA_1',
'tl_type': 'Custom', 'user_defined_name': 'Center', 'vendor': 'EMVA_D',
'version': '1.2.3'}, {'display_name': 'TLSimuMono (SN_InterfaceB_0)',
'id_': 'TLSimuMono', 'model': 'TLSimuMono', 'serial_number':
'SN_InterfaceB_0', 'tl_type': 'Custom', 'user_defined_name': 'Center',
'vendor': 'EMVA_D', 'version': '1.2.3'}, {'display_name': 'TLSimuColor
(SN_InterfaceB_1)', 'id_': 'TLSimuColor', 'model': 'TLSimuColor',
'serial_number': 'SN_InterfaceB_1', 'tl_type': 'Custom',
'user_defined_name': 'Center', 'vendor': 'EMVA_D', 'version': '1.2.3'}]
Getting Ownership of a Target Device
An ImageAcquirer object can be created by being specifying a target device to be mapped. The ImageAcquirer class objects work on the image acquisition task for you. In the following example it will be trying to create an ImageAcquirer object of the first candidate device on the device information list:
ia = h.create()
Or equivalently:
ia = h.create(0)
You can connect the same device passing more unique information to the method. In the following case, we specify a serial number of the target device; as long as you rely on this approach it is not necessary to know which index is mapped to the device:
ia = h.create({'serial_number': 'SN_InterfaceA_0'})
As we have just demonstrated, you can specify a target device by specifying properties that are defined by the DeviceInfo class; the device_info_list is a list containing DeviceInfo class objects and each of them is mapped to a unique device..
You can browse the available property names, i.e, the keys of the dictionary by executing the following code:
print(DeviceInfo.search_keys)
Then you would get the following output:
['access_status', 'display_name', 'id_', 'model', 'parent',
'serial_number', 'tl_type', 'user_defined_name', 'vendor', 'version']
Note that it is invalid if the specifiers gives you two ore more devices. Please specify sufficient information so that the combination gives you a unique target.
For example, You can specify multiple properties if the combination can find a unique device on the list:
ia = h.create({'vendor': 'Itchy & Scratchy Inc.', 'tl_type': 'GEV'})
We named the image acquirer object ia in the above example but in a practical occasion, you may give it a purpose oriented name like face_detection. Note that a camera itself does NOT acquirer/receive images but it just transmits them. In a machine vision application, there should be two roles at least: One transmits images and the other acquires them. The ImageAcquirer class objects play the latter role and it holds a camera as the remote_device object, the source of images.
Acquiring images
Then now we start image acquisition:
ia.start()
Once you started image acquisition, you should definitely want to get an image. Images are delivered to the acquirer allocated buffers. To fetch a buffer that has been filled up with an image, you can have 2 options; the first option is to use the with statement:
with ia.fetch() as buffer:
    # Work with the Buffer object. It consists of everything you need.
    print(buffer)
    # The buffer will automatically be queued.
Having that code, the fetched buffer is automatically queued once the code step out from the scope of the with statement. It’s prevents you to forget queueing it by accident. The other option is to manually queue the fetched buffer by yourself:
buffer = ia.fetch()
print(buffer)
# Don't forget to queue the buffer.
buffer.queue()
In this option, again, please do not forget that you have to queue the buffer by yourself. If you forget queueing it, then you’ll lose a buffer that could be used for image acquisition. Everything is up to your design, so please choose an appropriate way for you. In addition, once you queued the buffer, the Buffer object will be obsolete. There’s nothing to do with it.
Note that the fetch method waits forever until an image containing buffer is delivered to the GenTL Producer. In the real world where we live, however, it may be too much to guarantee every single image delivery succeeds. If you do not want to keep hanging it forever then you should pass some amount to the timeout parameter of the method; the unit is second:
from genicam.gentl import TimeoutException

try:
    buffer = ia.fetch(timeout=3)
except TimeoutException as e:
    # oops, it's timed out but it may be reasonable
    # depending on the context.
If no buffer is delivered within 3 seconds then the method will raise the genicam.gentl.TimeoutException exception. On the other hand, you may want to have the None object instead of excepting an exception. For such a case, let’s call the try_fetch method with some amount of period for the timeout:
buffer = ia.try_fetch(timeout=3)
if buffer:
    # the buffer is ready and you can start working on it.
If no buffer is delivered within 3 seconds, then the method will return the None object.
Okay, everything has been done. Now you may want to stop image acquisition by calling the stop method as follows:
ia.stop()
Closing application
The following code disconnects the connecting device from the image acquirer; you’ll have to create an image acquirer object again when you have to work with a device:
ia.destroy()
If you finished working with the Harvester object, then release the acquired resources calling the reset method:
h.reset()
Now you can quit the program! Please not that Harvester and ImageAcquirer also support the with statement. So you may write program as follows:
with Harvester() as h:
    with h.create(0) as ia:
        # Work, work, and work with the ia object.
        # The ia object will automatically call the destroy method
        # once it goes out of the block.

    # The h object will automatically call the reset method
    # once it goes out of the block.
This way prevents you forget to release the acquired external resources. If this notation doesn’t block your use case then you should rely on the with statement.
Miscellaneous
Reshaping a NumPy Array as an Image
We have learned how to acquire images from a target device through an ImageAcquirer class object. In this section, we will learn how to reshape the acquired image into another that can be used by your application.
First, you should know that Harvester returns you an image as a 1D NumPy array.
buffer = ia.fetch()
_1d = buffer.payload.components[0].data
Perhaps you may expect to have it as a 2D array but Harvester doesn’t in reality because if Harvester provides an image as a specific shape, then it could limit your algorithm that you can apply to get the image that fits to your expected shape. Instead, Harvester provides you an image as a 1D array and also provides you required information that you would need while you’re reshaping the original array to another.
The following code is an except from Harvester GUI that reshapes the source 1D array to another to draw it on the VisPy canvas. VisPy canvas takes content as an image to draw:
from harvesters.util.pfnc import mono_location_formats, \
    rgb_formats, bgr_formats, \
    rgba_formats, bgra_formats

payload = buffer.payload
component = payload.components[0]
width = component.width
height = component.height
data_format = component.data_format

# Reshape the image so that it can be drawn on the VisPy canvas:
if data_format in mono_location_formats:
    content = component.data.reshape(height, width)
else:
    # The image requires you to reshape it to draw it on the
    # canvas:
    if data_format in rgb_formats or \
            data_format in rgba_formats or \
            data_format in bgr_formats or \
            data_format in bgra_formats:
        #
        content = component.data.reshape(
            height, width,
            int(component.num_components_per_pixel)  # Set of R, G, B, and Alpha
        )
        #
        if data_format in bgr_formats:
            # Swap every R and B:
            content = content[:, :, ::-1]
    else:
        return
Note that component.num_components_per_pixel returns a float so please don’t forget to cast it when you pass it to the reshape method of NumPy array. If you try to set a float then the method will refuse it.
It’s not always but sometimes you may have to handle image formats that require you to newly create another image calculating each pixel component value referring to the pixel location. To help such calculation, Component2DImage class provides the represent_pixel_location method to tell you the 2D pixel location that corresponds to the pixel format. The pixel location is defined by Pixel Format Naming Convention, PFNC in short. The array that is returned by the method is a 2D NumPy array and it corresponds to the model that is defined by PFNC.
pixel_location = component.represent_pixel_location()
The 2D array you get from the method is equivalent to the definition that is given by PFNC. The following screenshot is an excerpt from the PFNC 2.1:
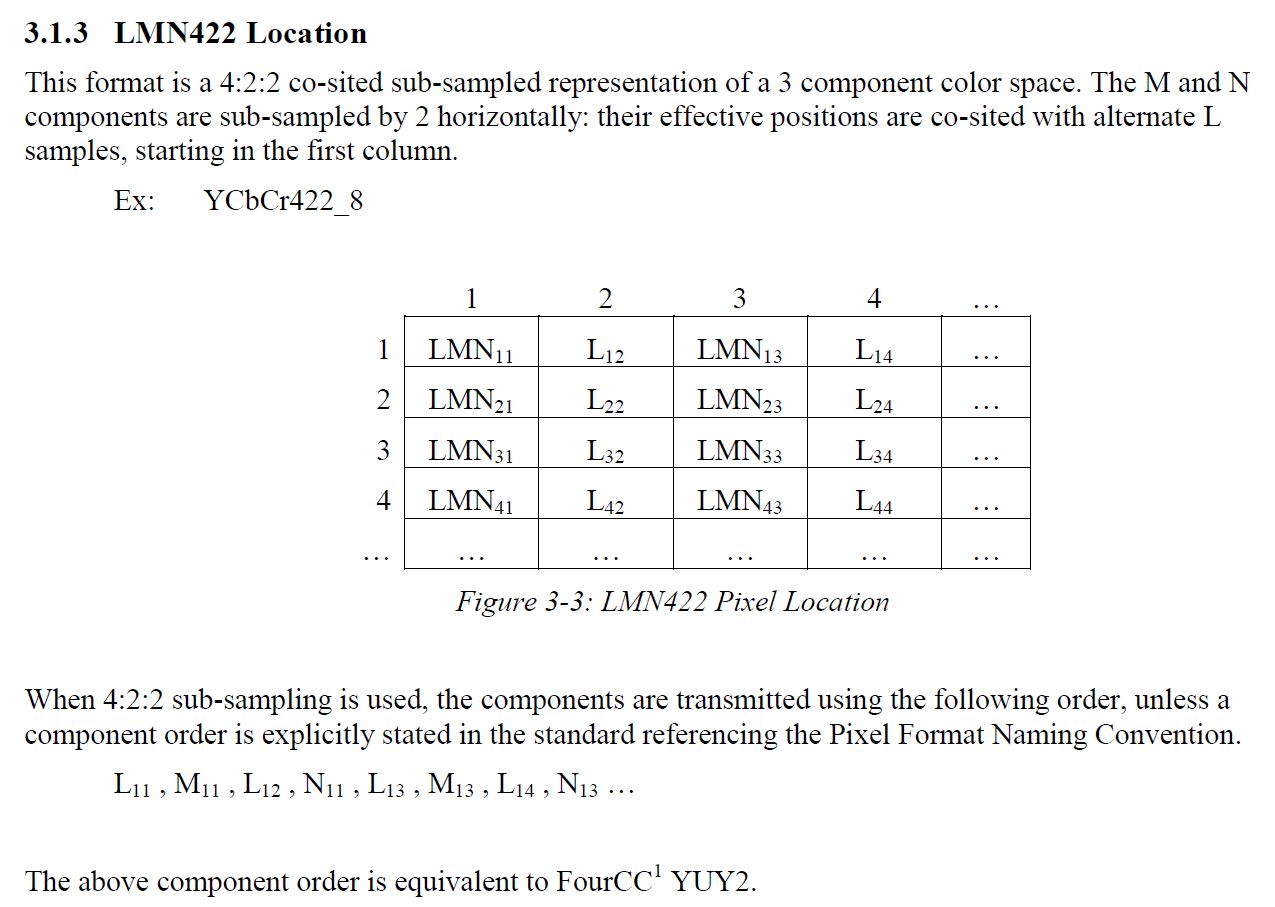
For example, if you acquired a YCbCr422_8 format image, then the first and the second rows of pixel_location would look as follows; L is used to denote the 1st component, M is for the 2nd, and N is for the 3rd, and they correspond to Y, Cb, and Cr respectively; in the following description, for a given pixel, the first index represents the row number and the second index represents the column number and note that the following index notation is based on one but not zero though you will use the zero based notation in your Python script:
[Y11, Cb11, Y12, Cr11, Y13, Cb13, Y14, Cr13, ...]
[Y21, Cb21, Y22, Cr21, Y23, Cb23, Y24, Cr23, ...]
Having that pixel location, you should be able to convert the color space of each row from YCbCr to RGB.
import numpy as np
# Create the output array that has been filled up with zeros.
rgb_2d = np.zeros(shape=(height, width, 3), dtype='uint8')
# Calculate each pixel component using pixel_location.
# Calculation block follows:
#     ...
For example, if you have an 8 bits YCbCr709 image, then you can get the RGB values of the first pixel calculating the following formula:

Similarly, you can get the RGB values of the second pixel calculating the following formula:

Once you finished filling up each pixel with a set of RGB values, then you’ll be able to handle it as a RGB image but not a YCbCr image.
You can download the standard document of PFNC at the EMVA website.
Manipulating GenICam Feature Nodes
Probably almost of the Harvester users would be interested in manipulating GenIcam feature nodes through Harvester. Let’s assume that we are going to control a GenICam feature node called Foo.
To get the value of Foo, we code as follows:
a = ia.remote_device.node_map.Foo.value
On the other hand, if Foo is an Integer node then we code as follows to set a value:
ia.remote_device.node_map.Foo.value = 42
If Foo is a Boolean node, then you code as follows:
ia.remote_device.node_map.Foo.value = True
Or if Foo is an Enumeration node, then you code as follows; it also works for a case where Foo is a String node:
ia.remote_device.node_map.Foo.value = 'Bar'
If Foo is a Command node, then you can execute the command with the following
ia.remote_device.node_map.Foo.execute()
There you can dive much more deeper in the GenICam GenApi but the description above would be sufficient for a general use.
Ah, one more thing. You may want to know the available GenICam feature nodes in the target remote physical device. In such a case, you can probe them calling the dir function as follows:
dir(ia.remote_device.node_map)
You should be able to find (probably) familiar feature names in the output.